
Installing docXtend cannot be simpler. We do all the heavy lifting for you behind the scenes, with a wizard based setup. The installer will deploy the software, configure it, connect to your database and content manager, analyze your data model, identify those tables with binary content, present them for your selection and definition of metadata mappings (you can skip them all and use the defaults) and create the data virtualization layer in order to enable the no-code integration with your Enterprise Content Manager platform. Just reconfigure your application through the created schema (will be named as your original application schema with the suffix “_DXTND_“) an is all set.
Let’s go with the details… (additional configuration information is described in the setup tool itself; read carefully while installing).
Requirements
First thing first. What will you need for a successful implementation:
- An existing app storing content in a database: This is the application you would like to integrate with the content manager. It must store the ‘to-be-integrated’ content in a database, either Oracle or SQL Server in binary table attributes (BLOB attributes in Oracle terminology; image or varbinary(max) in SQL Server’s).
- An Alfresco or CMIS based content manager: You must have an Alfresco or CMIS compliant content manager. If still not provisioned and you are familiar with docker/docker-compose, it is very simple to bring up an environment in minutes based on the Alfresco community version.
- A Linux or Windows server with java: You will need a server where the docXtend where run the setup and the agent will be installed. It is required a recent release of one of the supported x64 java versions (java 8 or 11). Check our supported configurations for details.
From the connectivity perspective, it is required:
- Outbound Internet connections through https to two well known addresses: https://app.docxtend.tecknolab.com and https://admin.docxtend.tecknolab.com.
- DB client connections from the agent host with the database server (by default, TCP 1521 in Oracle, TCP 1433 in SQL Server; this may be different depending on your DB setup).
- TCP connectivity from the database host(s) and the agent host (TCP 8099 by default, but this can be configured during setup).
- HTTP(s) connectivity from the agent host and the content manager.
With those pre-requisites fulfilled, you will have a successful implementation in minutes.
Installation modules
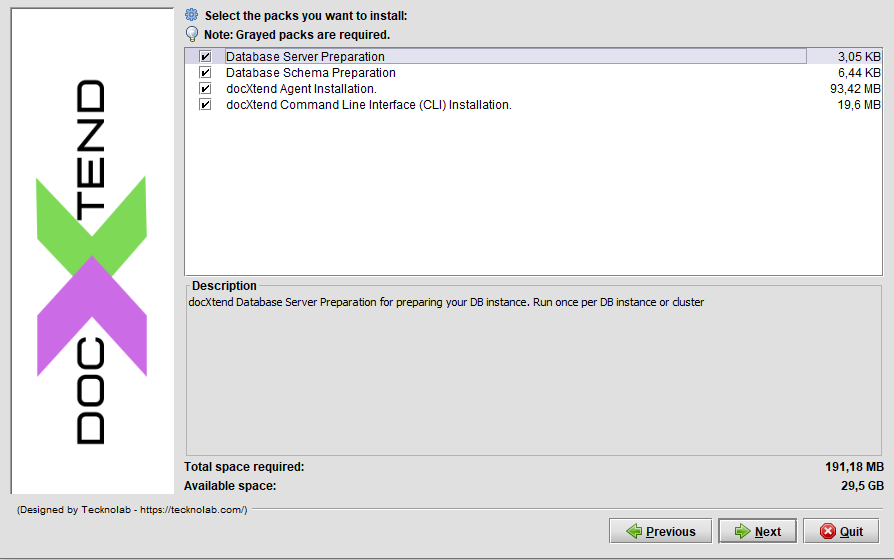
docXtend setup installer is comprised of four modules, designed to be potentially executed several times, depending on your requirements and deployment strategy.
- Database server preparation: Once per Database environment. Required as initial setup to have a functional environment.
- Database schema preparation: Typically once per Database schema (one application typically uses one database schema). Required for at least one schema (the schema where our application stores the data)
- docXtend Agent installation: One per host where the agent will be installed (depending on your setup strategy described above). Required in at least one host. It may be the same database host.
- docXtend CLI installation: Command line interface (CLI) installation. Once per host or workstation where we need to execute the CLI.
When executing the installer, we can select or deselect those modules, so the installation comprises those parts required. In an initial test setup, we will typically select and install all the modules in a host.
Depending on the selected modules, the installation wizard will present the different information gathering panels and checks, in order to generate a correct installation.
If you are planning to install the agent in several hosts (either at the database hosts or independent hosts) it is important to activate the check of ‘Clustered agent installation’ (in Agent data panel if Database Server preparation module is selected) . This will ensure that all the agent instances in the cluster share and get notified any configuration change. If you already have a non-clustered installation and need to upgrade to a clustered setup, please go to your My-account section in our website and file a support request for configuration instructions through the CLI.
Information to be provided
As a summary, the information you need to collect in order to successfully deploy the solution is:
- docXtend service license: You have to provide your service id and license. This information is generated once you order the docXtend license and will be sent to you by email. Access here to request a FREE one; if already registered and ordered, here to get the order status and licensing information (it may take a few hours from requested to provisioned).
- Database dba credentials: Some setup processes (e.g. defining security configuration to allow the connection from the database with our docXtend agent installed) requires dba privileges (sysadmin in SQL Server). This is ONLY required during setup. We will not store nor use those credentials during the solution operation; docXtend will use a low-privileged database user to create a configuration schema and store configuration settings; this user is automatically created during setup with the password defined by you.
- Schema credentials: In order to automatically create the data virtualization layer for your application data model during setup, we require the database credentials for the user that is the application tables’ owner. The setup will automatically inspect the data model and identify those tables that has binary fields (BLOB attributes). Based on that list of candidate tables and attributes, you will have the option to define the metadata mappings that will govern your cotent manager integration. You will only be able to archive data from the table/attribute you select at this stage. However, it is supported to re-run the installer again, select the module “Database schema preparation” and select additional tables/atributtes from the same or different schema if you change your opinion and decide to move data from additional tables. The FREE version will only allow integration from a single attribute in a single table.
- Content Manager credentials: Provide the connection and credentials to your content manager. There is a specific choice for Alfresco with a predefined format for the connection URL (where you will typically only change the host and port); for any other CMIS compatible content manager, select the CMIS dropdown menu to set the connection URL and user credentials. For using BOX as content manager, select the specific choice from the dropdown menu and use a JSON connection file for the connection settings (the JSON connection file should be generated using the BOX developer console, authorizing a new application using JWT authentication. Check https://developer.box.com/guides/authentication/jwt/jwt-setup/ for additional details).
- Agent DNS name or IP: This where you define how the database will reach the docXtend agent installed during setup. So, it will be the name or IP of the host where you are installing the solution or preferably, a custom entry in your DNS directory pointing to the server. Make sure this name is resolvable from the database server wherever it is located (so for example a “ping <agent-host-name>” from the database server will correctly resolve the agent IP address). If this setting need to be updated, run the setup again in “update mode”.
- Metadata mappings: This is the key part of the setup where we define how the data will be placed and structured in the content manager (which subfolder, what name, description, custom properties’ values, document type,…). It is not mandatory to set any of this values but defining them for every candidate table attribute that will be integrated will enrich your data management capabilities at the content manager. It may be easy to fail when defining the right names and folder structure for your content. During setup, the tool will simulate a few values for the existing content, so you can check if the generated values are the expected or not and fix the mappings. However, if we want to update the mappings once we have already moved some content to the content manager, it is recommendable to restore the content back to the database (with the CLI “docxtend rollback” command) and update the mappings (running the setup tool in update mode). For this reason, we advise to start using a non-production environment where we can test several times the mappings configuration. Check our metadata mappings post for additional details.
It is important to notice that the setup tool will NOT move any data to your content manager. The setup is only adapting the environment to enable this operation. For effectively moving data to the content manager you need to reconfigure your application and point it to the created virtualization layer (a new schema automatically created during setup with the same name and suffix “_DXTND_”); content will be moved as it is inserted or updated (with jobs executed every minute). For the existing backlog, use the CLI command “docxtend move”.
Windows installation
We provide a graphical user interface for the windows installer. Just double-click on the docxtend-setup.jar and follow the installation instructions. The setup will request Administration rights in order to properly create the installation directory and install the agent service (a “docXtend Agent” service is installed in the server when selecting the “Agent installation” module).
In the case you need to use a command line based installer (e.g. installing through a console interface) follow the following procedure:
-
- Open a Command Line console with Administration rights.
- Execute the installer through the command “java -jar docxtend-setup.jar -console”
Important note for windows users:
When downloading the docxtend-setup.jar file through a desktop or server with Microsoft Antimalware executable installed and active, the server may take a very long time analyzing the file and preventing its execution (the setup is a large java jar file packed as windows executable and Microsoft Antimalware is extremely inefficient analyzing these type of files). We recommend to close the browser used for downloading the file as a way to cancel the analysis. In the case of any issue downloading or installing our software, please, open a support ticket through the My account area and we will promptly provide an alternate download mechanism.
Linux installation
The Linux based installation is very similar to the Windows installation (the graphical interface is exactly the same) with the following caveats:
- You can use a command line or graphical interface for setting up docXend. As expected, the graphical interface is more intuitive but both provides the exact same results. Use the option -console for a console based interface.
- From a security perspective, we recommend to use a non-root user for installing docXtend. The docxtend-agent service will run using the user that executes the setup, so it is convenient to use a non-privileged user. However, during setup this user will require sudoable rights (with no password). Those rights can be temporarily granted during setup only (see the detailed instructions below).
- The setup tool will not have the required privileges to automatically create the install directory (by default /usr/local/docxtend). Create it in advance and assign it to the ‘docxtend’ user.
Recommended instructions:
- Create a linux OS user (e.g.):
sudo useradd docxtend
- Create a install dir (by default /usr/local/docxtend) and assign it to docxtend user
sudo mkdir /usr/local/docxtend
sudo chown docxtend /usr/local/docxtend
- Check that you have installed java 64bit version. Otherwise install it from Oracle website
java -version
- In order to run the installer graphical interface, you may need to enable xhost in your current session. Otherwise, the console based version will be used instead. E.g.:
xhost +
- Run a shell with docxtend user
sudo su – docxtend
- In order to run the graphical interface instead of the command one, you may need to set the DISPLAY variable to your local session (providing you are running a graphical linux interface):
export DISPLAY=:0.0
- Make it (temporarily) sudoable without password (procedure may vary depending on the linux distro and security settings). E.g.:
sudo /usr/sbin/usermod -aG wheel docxtend
- Execute the installer
java –jar docxtend-setup.jar
- Follow the setup instructions.
Checking the installation
Providing that the installation is successful (otherwise, please go to my-account and file a support request), we should check that the solution is working correctly.
The typical and most frequent source of problems is the connectivity from the database with the agent, the agent with the content manager. So we have to make sure that those connections are possible and there are no problems (routing / firewalling) preventing them.
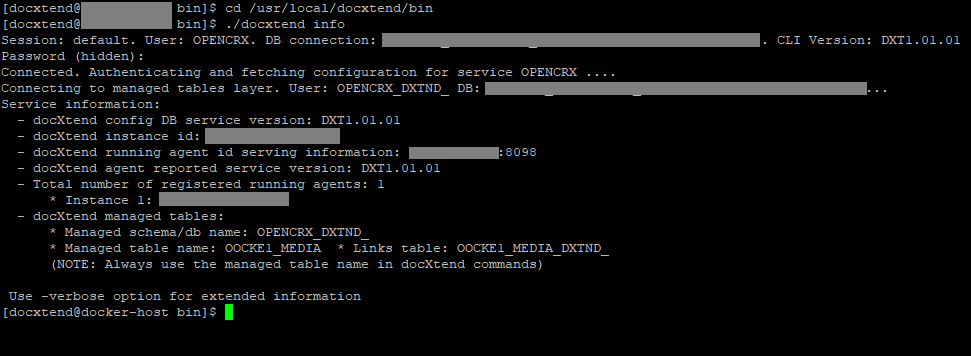
The simplest to check that everything is OK is using the CLI command “docxtend info -test” (executing from the install directory). In the default setup, it will request our schema credentials (the DB credentials for our application schema, that we already provided during setup), provide a general set of setup information (agent host, product version, managed tables, …) and perform a basic connectivity check ensuring that everything is OK. If not, check that the agent is started and any potential error message (very frequently the problem is that we configured a wrong address name for the agent host, so when the database is trying to locate the docXtend agent, the request fails). If you cannot find the problem, file a support request.
Uninstalling
We love that our customers use our technology but if they don’t want it, we ensure they have an easy way to restore their original setup, both in the docXtend host and in the database. Upon install we put an uninstaller in the <INSTALL_DIR>/uninstall folder. Just double click or execute “java –jar docxtend-uninstall-setup.jar” and follow the uninstaller instructions for restoring everything . After full uninstall you should only have the <INSTALL_DIR>/uninstall folder with the uninstaller jar. Just delete them manually.
For uninstalling is required to restore back in the database any content moved to the content manager; otherwise, the uninstall will generate and error message and abort. For restoring the content, just use the “docxtend rollback” CLI command.
If you have executed the setup several times (e.g. for installing agent instances in several hosts or for adapting several database schemas) you should run the uninstaller also several times, in the reverse order. (e.g. first uninstall the agent in all the additional hosts where you installed it and finally, uninstall the other modules; the “Database Server Preparation” should be in the last execution).
After successful installation, the next steps that you can take are:
- Activate the integration
The integration will not be active until you effectively conmute your application database connection to the new data virtualization layer created during setup (the setup tool will give you the exact name of the new schema, typically the original one plus a “_DXTND_” suffix). No data will be moved to the content manager until this operation is done and some activity (inserts or updates in the managed table / attribute) is performed. You can check with the CLI command “docxtend info” if there is any enqueued content (pending to be moved to the content manager) and any error message in the case that the operation is failed.
- Check your statistics (activity dashboard)
An operational dashboard is automatically generated in your customer My-account section. Just check the information to validate that everything is OK and the transferred content statistics are the expected.
- Move old data
Old data (content already stored in the application database before docXtend setup) is not automatically moved (this may require, depending on the volume, specific windows or data segmentation to avoid high database/content manager loads). Use the “docxtend move <table> <attribute>” command for executing this operations (-help option will provide detailed information for the available options). The -where option is useful for providing a SQL filter expression in order to segment/select the candidate rows to be moved.
- Rollback (restore data back to the database)
The “docxtend rollback” command is the opposite to “docxtend move”. With rollback, we can move data back to our database, either because we want to update the mappings or because we want to uninstall the solution (we require a full restore of the information before executing a uninstall in order to avoid any data loss).
We have described the main topics regarding docXtend installation and configuration. In the case of doubts or problems, please don’t hesitate to fill a support request through you My-account section.
That’s all folks; go ahead and request your FREE license!